Showing posts with label Science & Technology. Show all posts

Saturday, June 8, 2024

What is My IP Address?

What is My IP Address?

In our increasingly connected world, understanding basic elements of internet functionality is essential. One such crucial element is the IP address. "What is my IP address?" is a common question, often prompted by a need for enhanced security, troubleshooting network issues, or simply curiosity about how the internet works. This article will demystify the concept of IP addresses, explain their types, uses, and how you can find yours.

 What is an IP Address?

An IP (Internet Protocol) address is a unique identifier assigned to each device connected to a network that uses the Internet Protocol for communication. Much like a postal address that ensures mail reaches the right destination, an IP address ensures that data sent over the internet reaches the correct device.

 Types of IP Addresses

There are two main types of IP addresses: IPv4 and IPv6.

 IPv4

IPv4 addresses are the most commonly used and consist of four sets of numbers separated by periods (e.g., 192.168.1.1). Each set can range from 0 to 255, providing approximately 4.3 billion unique addresses. Despite this seemingly large number, the explosive growth of internet-connected devices has led to a shortage of available IPv4 addresses.
 IPv6

To address the limitations of IPv4, IPv6 was introduced. IPv6 addresses are longer, consisting of eight groups of four hexadecimal digits separated by colons (e.g., 2001:0db8:85a3:0000:0000:8a2e:0370:7334). This format allows for a vastly larger number of unique addresses, accommodating the growing number of devices.

 Public vs. Private IP Addresses

IP addresses can also be categorized as public or private.

 Public IP Addresses

A public IP address is assigned to your device by your Internet Service Provider (ISP) and is used to communicate over the internet. This address is visible to websites you visit and other devices on the internet.

 Private IP Addresses

Private IP addresses are used within a local network (e.g., within your home or office). These addresses are not visible to devices outside the local network. Common ranges for private IP addresses include 192.168.0.0 to 192.168.255.255 and 10.0.0.0 to 10.255.255.255.

Dynamic vs. Static IP Addresses

IP addresses can be either dynamic or static.

 Dynamic IP Addresses

Dynamic IP addresses are assigned by a DHCP (Dynamic Host Configuration Protocol) server and can change over time. Most ISPs provide dynamic IP addresses, which are sufficient for typical internet usage.

 Static IP Addresses

Static IP addresses are manually assigned and do not change. They are often used for servers or services that need a consistent address for access, such as websites or email servers.
 How to Find Your IP Address

Finding your IP address is straightforward:

1. Public IP Address: 
   - Simply search "What is my IP address?" on a search engine. Various websites, such as WhatIsMyIP.com or IP Chicken, will display your public IP address.

2. Private IP Address:
   - Windows: Open Command Prompt and type `ipconfig`. Your private IP address will be listed under the network adapter you are using.
   - Mac: Go to System Preferences > Network, select your network connection, and your IP address will be shown.
   - Linux: Open a terminal and type `ifconfig` or `ip a`.

 Why Knowing Your IP Address Matters

Understanding and knowing your IP address can be important for several reasons:

- Troubleshooting Network Issues: Identifying your IP address can help diagnose connection problems.
- Security: Knowing your IP can help monitor for unauthorized access or potential threats.
- Remote Access: For accessing your home network remotely, you’ll need to know your public IP address.

 Conclusion

Your IP address is a fundamental component of your internet experience, serving as the unique identifier that enables your device to communicate within a network and with the wider internet. Whether you're managing a network, troubleshooting issues, or just satisfying your curiosity, understanding IP addresses is a valuable skill in the digital age.

Where's My Refund: A Guide to Tracking Your Tax Return Status

Where's My Refund: A Guide to Tracking Your Tax Return Status

For many taxpayers, the anticipation of a tax refund can be akin to waiting for a much-needed financial boost. Whether you’re planning to pay off debt, make a significant purchase, or save for the future, knowing the status of your refund is crucial. Fortunately, the Internal Revenue Service (IRS) offers a streamlined tool to help you track your refund: the "Where's My Refund?" service.

 Understanding the "Where's My Refund?" Tool

The IRS’s "Where's My Refund?" tool is an online service that allows taxpayers to check the status of their federal tax return and refund. It is accessible via the IRS website and the IRS2Go mobile app. This tool provides real-time updates on the status of your refund and is available 24 hours after the IRS receives your e-filed return, or four weeks after you mail a paper return.

 How to Use the "Where's My Refund?" Tool

To use the "Where's My Refund?" tool, you will need the following information:

1. Social Security Number (SSN) or Individual Taxpayer Identification Number (ITIN):This unique identifier ensures that you can access the correct tax return information.
2. Filing Status: You must select your filing status as listed on your tax return (e.g., single, married filing jointly, etc.).
3. Exact Refund Amount:This is the amount you are expecting as a refund, which can be found on your completed tax return.

Once you enter this information, the tool will display one of three statuses:

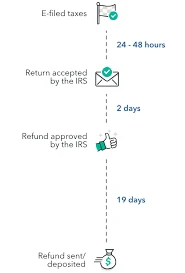
1. Return Received: The IRS has received your tax return and is processing it.
2. Refund Approved: The IRS has processed your return and approved your refund. This status will also provide an estimated date for when the refund will be sent to your bank or mailed.
3. Refund Sent: The IRS has sent your refund to your bank for direct deposit or mailed it to you. It may take a few more days for your bank to post the deposit to your account or for you to receive the check by mail.

 Tips for Using the "Where's My Refund?" Tool

- Check Once Daily: The IRS updates the tool once every 24 hours, usually overnight. Therefore, checking more frequently will not provide new information.
- Timing Matters: Refunds for returns claiming the Earned Income Tax Credit (EITC) or the Additional Child Tax Credit (ACTC) may be delayed due to additional processing requirements.
- Accuracy is Key: Ensure that the information you enter matches your tax return exactly to avoid delays in retrieving your refund status.

 Common Issues and Solutions

Despite its efficiency, you may encounter some common issues when using the "Where's My Refund?" tool:

- Information Mismatch: Ensure that your SSN, filing status, and refund amount match what you filed on your return. Even a small discrepancy can prevent you from accessing your status.
- Processing Delays: Sometimes, additional reviews or errors on your return can cause delays. If your status hasn’t changed after 21 days (for e-filed returns) or six weeks (for mailed returns), you may want to contact the IRS directly.
- IRS Contact:If you cannot get information through the tool and it’s been longer than the standard processing times, you can contact the IRS at their toll-free number: 1-800-829-1040.

 Final Thoughts

The "Where's My Refund?" tool is a valuable resource for taxpayers eager to receive their tax refunds. By ensuring you have the necessary information and understanding the potential issues, you can efficiently track your refund and plan your finances accordingly. Patience and accuracy are key in navigating this process, ensuring that your tax refund reaches you without unnecessary delays.

How to Take a Screenshot on a Mac: A Comprehensive Guide

How to Take a Screenshot on a Mac: A Comprehensive Guide

Taking screenshots on a Mac is a straightforward process, offering a variety of options to capture exactly what you need, whether it's the entire screen, a specific window, or just a portion of the screen. Here’s a detailed guide on how to use these features effectively.

1. Capturing the Entire Screen

 Using Keyboard Shortcuts
The simplest way to capture the entire screen is by using a keyboard shortcut:
- Press `Shift` + `Command` + `3`: This will capture the entire screen and save the image to your desktop by default.

Using the Screenshot Toolbar
- Press `Shift` + `Command` + `5`: This opens the Screenshot toolbar, which provides several capture options, including the ability to capture the entire screen, a selected window, or a portion of the screen. 

 2. Capturing a Specific Portion of the Screen

 Using Keyboard Shortcuts
- Press `Shift` + `Command` + `4`: Your cursor will turn into a crosshair. Click and drag to select the area you want to capture. Once you release the mouse button, the screenshot will be taken and saved to your desktop.

Using the Screenshot Toolbar
- Press `Shift` + `Command` + `5`: In the toolbar, select the option that looks like a dashed rectangle with a dot in the corner. This will allow you to click and drag to select a portion of the screen.

 3. Capturing a Specific Window

 Using Keyboard Shortcuts
- Press `Shift` + `Command` + `4`, then press the `Space` bar: The cursor will turn into a camera icon. Move the camera icon over the window you want to capture so it highlights, then click to take a screenshot of that window.

Using the Screenshot Toolbar
- Press `Shift` + `Command` + `5`: In the toolbar, select the option that shows a window icon. Click on the window you want to capture.

 4. Using the Touch Bar (for MacBook Pro with Touch Bar)
- Press `Shift` + `Command` + `6`: This captures everything on the Touch Bar. The screenshot will be saved to your desktop.

 5. Additional Tips and Tricks

 Changing the Save Location
By default, screenshots are saved to the desktop, but you can change this:
- Press `Shift` + `Command` + `5` to open the Screenshot toolbar.
- Click on the “Options” menu, where you can select a different save location or even set a timer for the screenshot.

 Annotating Screenshots
After capturing a screenshot, a thumbnail appears in the bottom-right corner of the screen. Click this thumbnail to open the screenshot in Markup, where you can annotate it with text, shapes, and other tools.

 Canceling a Screenshot
If you decide not to take a screenshot after invoking the shortcut, press the `Escape` key (Esc) to cancel the action.

 Clipboard Copy
If you want to copy a screenshot to the clipboard instead of saving it as a file:
- Press `Control` + `Shift` + `Command` + `3` to copy the entire screen.
- Press `Control` + `Shift` + `Command` + `4` to copy a selected portion of the screen.
- Press `Control` + `Shift` + `Command` + `4`, then `Space` to copy a specific window.

 Conclusion

Whether you need to capture the entire screen, a specific window, or just a portion of it, macOS provides versatile tools to make the process quick and easy. By mastering these keyboard shortcuts and utilizing the Screenshot toolbar, you can efficiently take and manage screenshots on your Mac for any purpose.

Friday, June 7, 2024

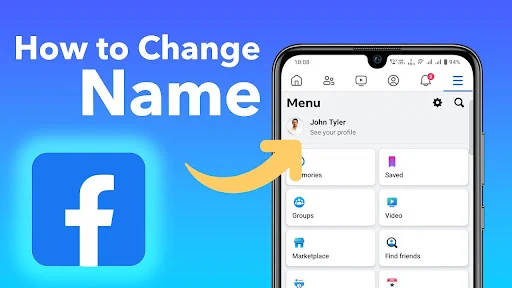
How to Change Your Name on Facebook

How to Change Your Name on Facebook

Changing your name on Facebook is a straightforward process, whether you're updating it due to a legal name change, wanting to use a nickname, or simply personal preference. Here’s a step-by-step guide on how to do it:

Before You Start

1. Review Facebook’s Name Standards: Facebook requires users to use the name they go by in everyday life. Avoid using any unusual capitalization, punctuation, characters, or titles.
2. Frequency of Changes: You can only change your name every 60 days. Plan accordingly.
3. Language-Specific Names: You can add an alternate name in another language if you are bilingual.

 Step-by-Step Guide to Changing Your Name on Facebook

 On Desktop

1. Log In to Facebook: Open your web browser and go to [Facebook](https://www.facebook.com/). Enter your username and password to log in.
   
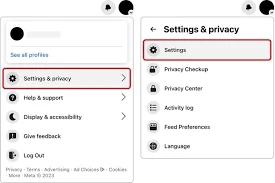
2. Access Settings: Click the downward-facing arrow in the top right corner of the Facebook homepage. From the dropdown menu, select “Settings & privacy” and then click on “Settings.”

3. Edit Name: In the "General Account Settings" section, you will see your name. Click the "Edit" button next to your name.

4. Enter New Name: A new window will open where you can enter your new first name, middle name (optional), and last name.

5. Review Your Name Change: Ensure your new name adheres to Facebook’s standards. After entering your new name, click “Review Change.”

6. Choose Display Format: Facebook will ask you how you want your name to appear on your profile. Select the appropriate format.

7. Enter Password and Save: Enter your Facebook password to confirm the change, then click “Save Changes.”
 On Mobile App

1. Open the Facebook App: Tap the Facebook app icon on your smartphone.

2. Go to Menu: Tap the three horizontal lines (menu icon) in the bottom right corner on iOS or the top right corner on Android.

3. Access Settings & Privacy: Scroll down and tap “Settings & privacy,” then tap “Settings.”

4. Personal Information: Under the “Account” section, tap “Personal and account information.”

5. Edit Name: Tap “Name,” and then enter your new first name, middle name (optional), and last name.

6. Review Change: Tap “Review Change” and choose how you want your name to appear.

7. Enter Password and Save: Enter your password to confirm, then tap “Save Changes.”

 Additional Tips

- Profile Verification: If you have a verified profile, changing your name might require additional steps.
- Other Names: If you want to display a nickname, maiden name, or other variations, you can add this by going to “About” on your profile and selecting “Details About You.”
- Notification to Friends: When you change your name, Facebook does not send a notification to your friends, but it will be visible on your profile.
 Troubleshooting

- Name Change Rejected: If Facebook rejects your name change, it may not meet their standards. Double-check the guidelines and try again.
- Too Many Changes: If you’ve changed your name too frequently, you may be temporarily blocked from doing so again. In this case, you’ll need to wait for the cooldown period to pass.

By following these steps, you can successfully change your name on Facebook, ensuring it reflects how you wish to be identified. Always make sure to follow Facebook’s guidelines to avoid any issues with your account.

A Step-by-Step Guide on How to Deactivate Your Facebook Account

 A Step-by-Step Guide on How to Deactivate Your Facebook Account

In this age of digital connectivity, social media platforms like Facebook have become an integral part of our daily lives. However, there are times when you may feel the need to take a break from the constant notifications, updates, and interactions that come with being a part of such platforms. If you're looking to disconnect temporarily from Facebook, deactivating your account might be the right choice for you. 

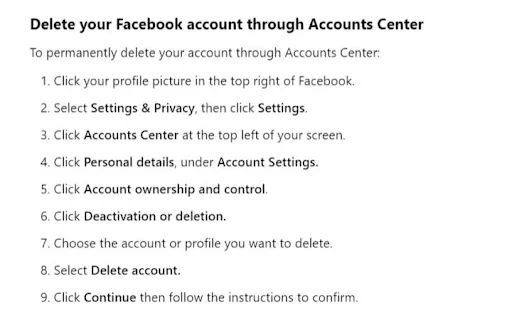
Deactivating your Facebook account is a temporary measure that allows you to take a break from the platform without permanently deleting your account and losing all your data. Here's a step-by-step guide on how to deactivate your Facebook account:

1. Log in to Facebook: Open your preferred web browser and go to www.facebook.com. Log in with your username (email address or phone number) and password.

2. Navigate to Settings: Once you're logged in, click on the downward arrow located in the top right corner of the Facebook homepage. From the drop-down menu, select "Settings & Privacy" and then click on "Settings."

3. Deactivate Your Account: In the Settings menu, click on "Your Facebook Information" in the left-hand column. From the options that appear, select "Deactivation and Deletion." Click on "Deactivate Account."

4. Choose Deactivation Reason: Facebook will ask you to select a reason for deactivating your account. You can choose from options like needing a break, too much time spent on Facebook, privacy concerns, or others. Select the reason that best fits your situation and click on "Continue."

5. Confirm Deactivation: Facebook may show you some of your friends' profile pictures and statuses, suggesting that they will miss you if you deactivate your account. If you're sure about deactivating, click on "Deactivate Now."

6. Enter Password: To confirm the deactivation, you'll be asked to enter your Facebook password. Enter your password and click on "Continue" to proceed with deactivating your account.

7. Account Deactivated: Once you've completed the steps above, your Facebook account will be deactivated. Your profile will no longer be visible to others on Facebook, but your information will be saved in case you decide to reactivate your account in the future.
Remember that while your account is deactivated, your profile, photos, posts, and comments will be hidden from other users. However, some information may still be visible to others, such as messages you've sent. If you wish to reactivate your account, you can do so by simply logging back in with your credentials.

Deactivating your Facebook account can be a helpful way to take a break from the platform and focus on other aspects of your life. Whether it's to reduce distractions, protect your privacy, or simply take some time off social media, knowing how to deactivate your account gives you the flexibility to step back when needed.

So, if you're feeling overwhelmed by the constant buzz of social media, consider deactivating your Facebook account using the steps outlined above. It's a simple process that can help you regain a sense of control over your online presence and digital well-being.

Euro 2024: A Look at the Mascots of the European Championships

 Euro 2024: A Look at the Mascots of the European Championships The UEFA European Championship, commonly referred to as the Euros, is one of...